Key Workshop Objectives
- Understand the basic structure of a Latex document
- Understand the typical Latex workflow
- To get you to a point where you feel confident using and experimenting with Latex on your own!
Contents
- Why use Latex? What’s wrong with Word?
- Typical Workflow
- Latex Editors
- Overleaf
- Basic Latex
- Latex Environments
- Sections, Abstracts, and Chapters
- Organizing Bigger Documents
- The \input{} Command
- Figures
- Footnotes
- Working with Equations
- Comments
- Bibliographies and Citations
- Table of Contents and Figure List
- The UoA Thesis Template
- Handy Tools
- Finished Project Code
- That’s it, Well done!
Why use Latex? What’s wrong with Word?
- Prevalence in academic literature
- Working with large documents
- Creating professional looking documents!
- Equations can be created easily in the math mode
- Tables, graphs and figures using
TikZ,PGF-Plotsvector graphics - Can even automatically populate graphs and figures using your existing research data (e.g. with
csvfiles) - Working with non-Latin scripts (Arabic, Sanskrit etc.)
- Not just used for academic literature
- Books, CVs, presentations, posters
- Check out the gallery here for all sorts of examples
…And most importantly, impress your peers who think you have to be some crazy tech-wizard to actually want to write your documents in Latex.
Typical Workflow
Do your writing in a Latex .tex file + Bibliography .bib file (optional) → Run the files through a Latex distribution (sometimes called a compiler) → LaTeX outputs a PDF
This is a different way of working to WYSIWYG editors like Microsoft Word. Some people claim this allows you to focus more on your content, instead of its appearance. On the other hand your writing now has Latex specific commands intermingled with it.
Latex Editors
These are what you actually do your writing in. Because Latex is written in plain text, if you wanted to (and plenty of people do) you could use a simple text editor like Notepad to do your writing, and then run the Latex distribution (the software that takes all your Latex files and outputs a PDF) yourself.
However, this is unnecessarily complicated and newer Latex editors provide lots of nice features like spell checking, code highlighting, and autocompletion.
You must have a Latex distribution installed on your computer to be able to build your Latex files. MikTeX and TeX Live are by far the most popular. On most Linux distributions and Mac OS, Latex comes pre-installed. Once you’ve got a distribution, go ahead and download the editor of your choosing.
My personal recommendations for desktop Latex editors:
- TeXstudio
- TeXmaker
- Texworks
However a more recent development in the Latex world is web based Latex editors. This is what we will be using today.
Overleaf
Overleaf is a modern web based Latex editor that allows you to work on Latex documents anywhere in the world without needing to install any software, all you need is your browser (and an active Internet connection).
Because it is a web based tool, it also has some other helpful features that you typically don’t get from desktop-based editors, the most useful of which are:
- Live
recompiling: Your changes are automatically reflected in the PDF preview as you’re working on them - Collaboration: Overleaf allows you to share your Latex projects with other users. This is especially useful for working with co-authors and/or sharing your papers with your supervisors as you’re working on them
Overleaf has a free plan. However, for full features they charge a monthly fee. Half price plans are available for students. In my opinion, the only major limiting feature to the free plan is that it only allows you to share your document with a single collaborator. Provided this isn’t a deal breaker, the free plan still provides heaps of features and allows you to create unlimited private projects.
Basic Latex
Every Latex document is comprised of a mixture of Latex commands and your actual content. Almost all Latex commands follow the exact same structure:
\command[optional arguments]{arguments}
Note the backslash (\) that precedes commands. This is what lets Latex know that everything following the backslash (up until the next space) should be interpreted as being a Latex command, rather than just ordinary content.
Almost all Latex commands take arguments. This is the information that you ‘pass’ to the command to tell it what to do. For example:
This text would appear formatted normally, but \textbf{this text would appear bold}.
The above command would appear in your PDF as:
In the example above, the command \textbf{} tells Latex to bold anything that appears between the two curly-braces {}.
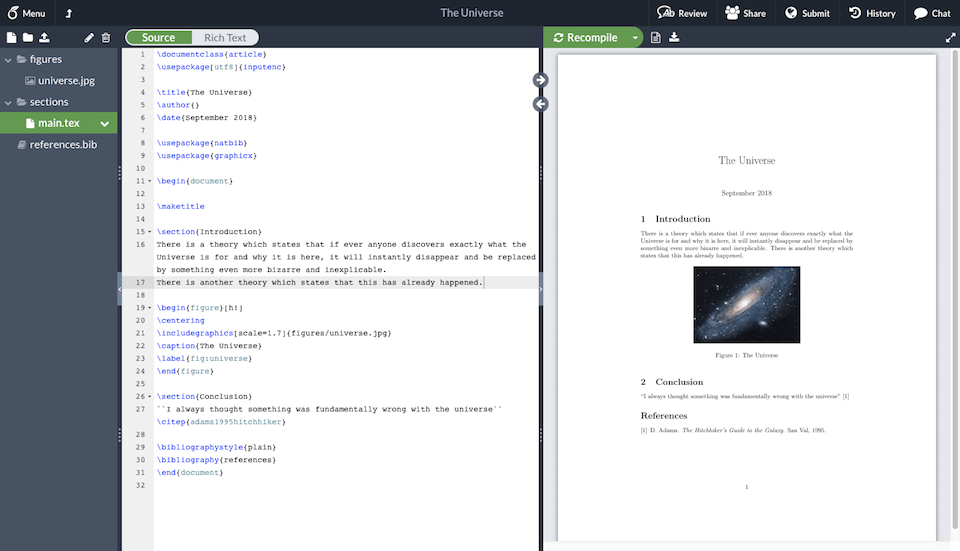
Latex Document Structure
Every Latex document follows the same structure:
Preamble Commands
 - This is where you do things like specify:
    - The document type: e.g. whether it's a book or a journal article, and one or two columns
    - The document title and author(s)
    - List any packages you want to use (more on this later)
----
Document Content
- This is where you actually put the content of your document, and is generally divided into different chapters and/or sections, or in Latex terms 'environments'
In actual Latex, this is what it looks like:
\documentclass[twocolumn]{article}
\title{My first Latex document}
\author{Sam Kavangah}

\begin{document}
\maketitle
This is the actual body of the document, this text would appear in the PDF.
\end{document}
That above code is a complete and valid Latex document. That is all you need! Latex will take care of sorting out all the default margins for you. It even generates a nice title, author, and date section for you based on the information you provided in the document preamble (i.e. the stuff that came before the begin{document} command).
If you were to paste the above code into Overleaf, you would see the following output PDF:
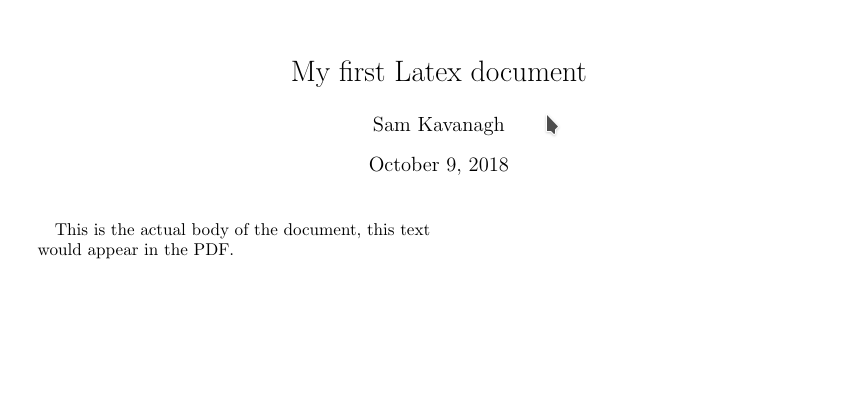
The text only goes halfway across the page because we specified that this was a twocolumn document in the Latex command:
\documentclass[twocolumn]{article}
This is an example of an optional argument, why is why it appears in []. You could have instead simply written:
\documentclass{article}
and your document would have defaulted to a single column article.
Latex Environments
Some commands have both opening and closing commands. These are generally referred to as environments, and you have already seen an example above.
\begin{document}
\end{document}
All content within the opening and closing command will have some sort of styling applied to them. For example, the environment below centers text:
\begin{center}
This text would be center-aligned!
\end{center}
You can nest environments within one another, however they must \begin{} and \end{} in the correct order. For example, the Latex code below would generate an error:
\begin{document}
\begin{center}
This text would be center-aligned!
\end{document}
\end{center}
Sections, Abstracts, and Chapters
Usually we don’t write our articles as one big block of content, instead we divide it into different chapters, sections, and subsections. Although it seems logical to use environments for sectioning, we don’t do this because when you’re potentially dealing with sections, subsections, and even subsubsections you can end up with chaotic looking code like this:
\begin{document}
\begin{section}{Section One}
...
\begin{subsection}{Subsection One}
...
\begin{subsubsection}{Subsubsection One}
...
\end{subsubsection}
\end{subsection}
\end{section}
\end{document}
Instead Latex has dedicated commands such as \section{} and \chapter{} to indicate the beginning of a new section, and these have no \end{} tag. For example:
\begin{document}
\section{Introduction}
This appears in the introduction section.
\subsection{Research Questions}
This text would appear in a subsection named '1.1 Research Questions'.
\end{document}
We’ll take a look at working with larger documents now instead of articles. Go ahead and create a new blank project named ‘thesis’ and delete the automatically generated contents.
Organizing Bigger Documents
Let’s create a basic outline for our new thesis project and build on it from here.
\documentclass{report}
\title{Sam's Latex Thesis}
\author{Sam Kavanagh}
\begin{document}
\maketitle
\chapter{Introduction}
Welcome to my professional looking Latex thesis.
\chapter{Background}
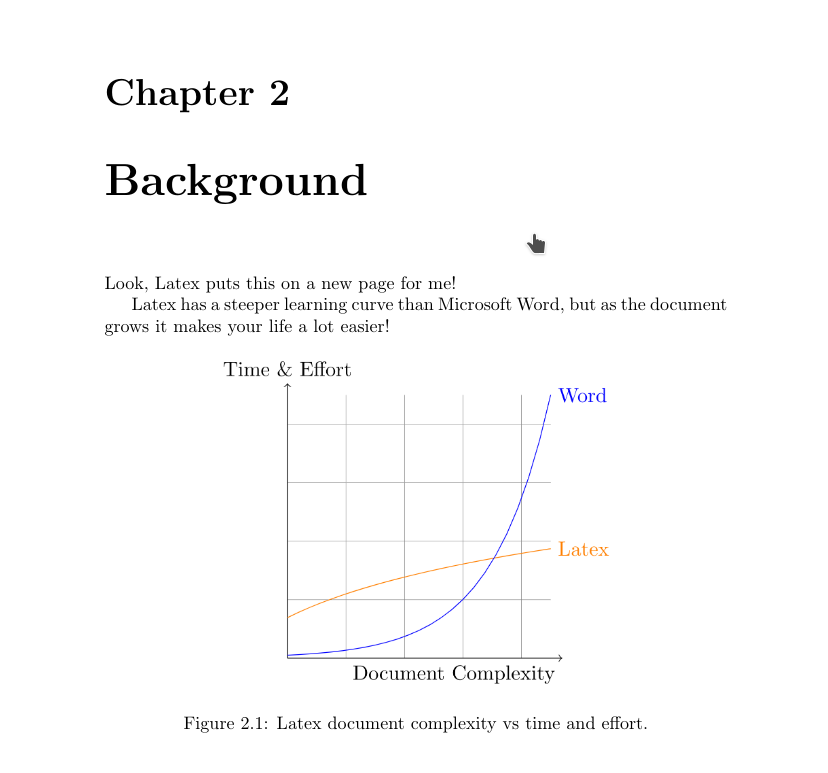
Look, Latex puts this on a new page for me!
\end{document}
One of the nice things about working with Latex is that you can easily split your content into different files (for example a different file for each chapter), and then have a single ‘main’ thesis file which combines all these files and outputs a single PDF. This makes life a lot easier when you start dealing with big documents like theses.
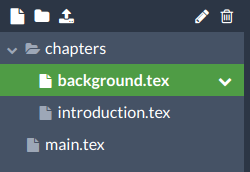
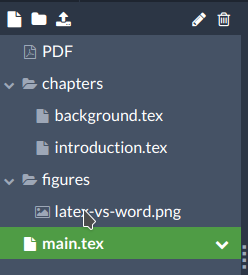
Let’s do that now. Create a new folder in your Latex project named chapters, and within the folder create 2 new files, introduction.tex and background.tex. Next we’ll take the content corresponding to each of the chapters from our existing main.tex file, and place it in the appropriate file. For example, the file background.tex should now look like this:
\chapter{Background}
Look, Latex puts this on a new page for me!
And your projects file structure should now look like this:
The \input{} Command
In order to tell our main.tex file to grab the content from our new files, we simply use the \input{} command, and pass it the path to our new files. This path is relative to the location of the file that the command is in. For example, if we had a file named methodology.tex within the same folder as our main.tex file we would use the command \input{"methodology"}.
However, because we’re nice and tidy Latex users, we put our chapters into the separate chapters folder, so we instead use the command input{"chapters/introduction"} and input{"chapters/background"}.
Our main.tex file should now look like this:
\documentclass{report}
\title{Sam's Latex Thesis}
\author{Sam Kavanagh}

\begin{document}
\maketitle

\input{"chapters/introduction"}
\input{"chapters/background"}

\end{document}
Figures
Most of our documents aren’t going to be comprised solely of text, but will include various figures (e.g. graphs and images). Latex handles the placement and referencing of figures in text very well (although it might seem a little confusing at first), and it is one of the primary reasons people prefer it over Microsoft Word when dealing with large documents.
There are many Latex packages (more on this later) that are able to produce beautiful professional looking graphs and figures by reading in your data, however these would require a workshop of their own. So for today we are going to assume we already have a figure that we have produced in another program, and we simply wish to include it in our document.
Uploading our own figure to Overleaf
I’ve gone ahead and created a simple graph for us to use as an example. Save a copy of the image to your personal computer by clicking here (if the link doesn’t work try this instead). Make sure you save the image somewhere you can find again!
Back in Overleaf, let’s create a new folder to save our figures. figures seems like the logical choice here! Make sure you don’t create this folder inside the chapters folder, to be safe try clicking the main.tex file before clicking the New Folder icon.
After we have our new folder it’s time to upload our existing figure. Click on the folder (so that it becomes highlighted) and then click the Upload button and find the file we just saved.
If it looks like your file hasn’t uploaded, try clicking the little > (expand) icon to the left of the figures folder. After you’re all done your new project structure should look like this:
The Figure Environment and Packages
To include a figure in Latex we work with the figure environment.
\begin{figure}
\end{figure}
Before we go any further it’s important to point out that by default Latex doesn’t provide much functionality for working with images (graphics), so it’s about time we start working with our very first package!
Packages are simply additional libraries that provide functionality beyond what Latex can do by default. To use a package in Latex is super easy, we just use the command \usepackage{packagename} in our documents preamble.
Jump back to our main.tex file and insert the following command on the line immediately after the \documentclass{} command (i.e. line 2):
\usepackage{graphicx}
graphicx is a very popular modern package that provides an improved way of working with graphics in Latex, and allows us to use a new command: \includegraphics{}.
Let’s update our background.tex with the following content:
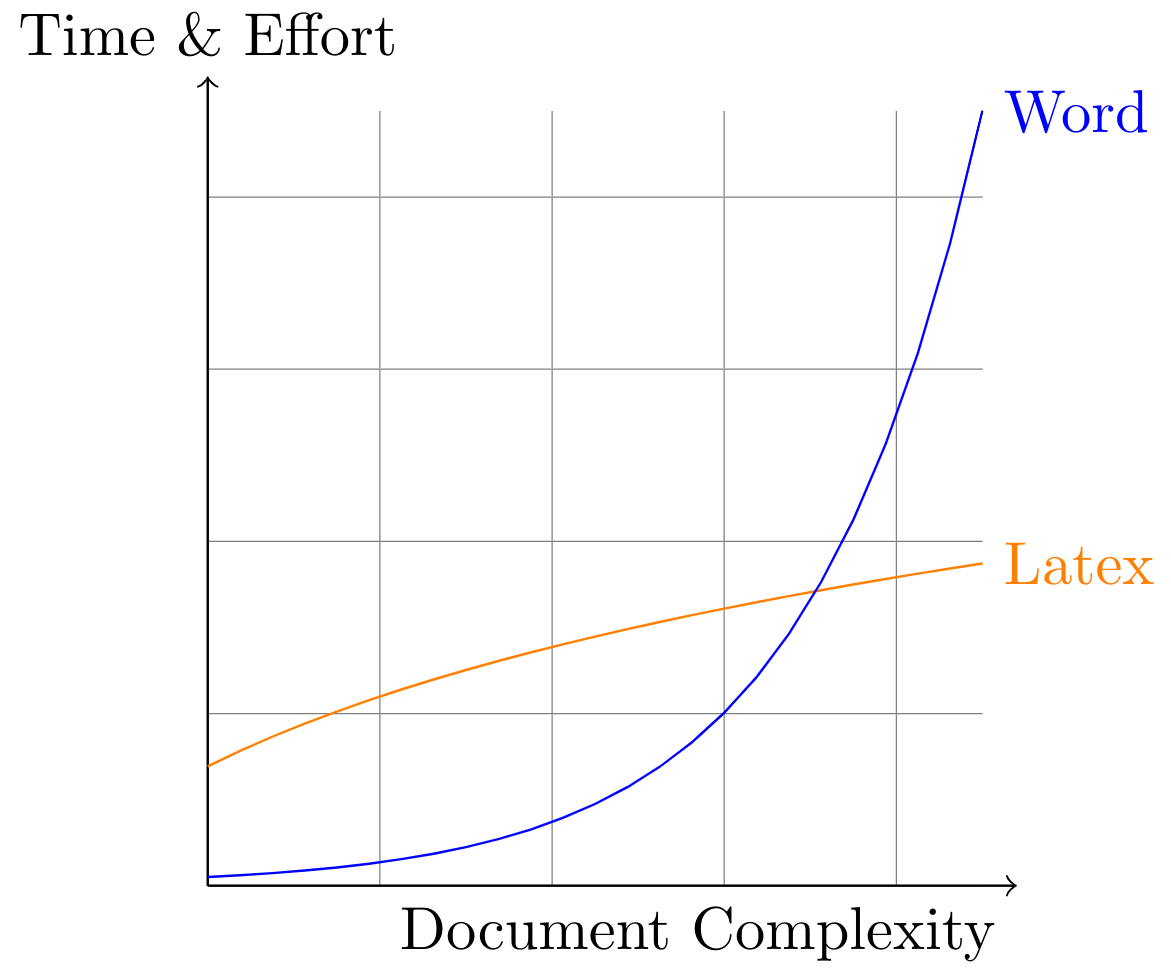
Latex has a steeper learning curve than Microsoft Word, but as the document grows it makes your life a lot easier!

\begin{figure}
    \includegraphics{"figures/latex-vs-word"}
\end{figure}
That didn’t work very well! Latex does include the figure just like we asked, however it makes no attempt to scale the image down to fit correctly, and tries to be helpful by putting the image on the next page (but we don’t want that!).
Time to work on improving our figure!
Scaling the figure
Step 1. Let’s get our image down to a size that’s more manageable. The \includegraphics{} command takes many optional arguments, including width, height, and scale and these are always written in the format key=value, for example: \includegraphics[width=300px]{"figures/latex-vs-word"}. In our case scale should do the job. Update the existing command to look like the one below:
\includegraphics[scale=0.25]{"figures/latex-vs-word"}
Image Placement
Much better, however our whole figure is still on the wrong page. Thankfully the \begin{figure} also takes optional arguments, you will often use these to tell the Latex that you want the figure placed at the top, bottom, or simply right here on the page!
Let’s update our figure to tell it that we want the figure placed here.
\begin{figure}[h]
Alignment
We’ve already looked at the center environment, so let’s go ahead and use that now to center our image on the page. Our figure code should now look like this:
\begin{figure}[h]
    \begin{center}
        \includegraphics[scale=0.25]{"figures/latex-vs-word"}
    \end{center}
\end{figure}
Captions
The last thing our figure needs is a caption, let’s add one now with (unsurprisingly!) the \caption{} command. Add a new line after the \includegraphics{} command, and insert the following:
\caption{Latex document complexity vs time and effort.}
That’s it! Your finished figure should look something like this:
Cross-Referencing our image
After the \end{figure} environment let’s add some text to refer to our snazzy new figure.
If you're still unsure about whether you want to use Microsoft Word or Latex, refer to Figure 2.1 for irrefutable evidence of Latex's superiority.
Typically when we’re writing big documents we add and remove figures as it grows, and keeping track of the numbers of figures becomes a pain. Thankfully Latex provides functionality for referring to other parts of your document using a combination of the \label{} and \ref{} commands.
These two commands work hand-in-hand: We use the \label{} command after any figure, chapter, section etc. to define a label that we can then refer to anywhere in our document using the \ref{} command.
These labels can be called anything we want, but most people like to start the label name with fig:, chap:, sec: etc. to make it easier to keep track of what they’re referring to.
Let’s create a label for our figure.
\begin{figure}[h]
    \begin{center}
        \includegraphics[scale=0.25]{"figures/latex-vs-word"}
        \caption{Latex document complexity vs time and effort.}
        \label{fig:latexVsWord}
    \end{center}
\end{figure}
Now let’s update the paragraph at the bottom of the page to use the \ref{} command, rather than doing it manually:
If you're still unsure about whether you want to use Microsoft Word or Latex, refer to Figure \ref{fig:latexVsWord} for irrefutable evidence of Latex's superiority.
That’s it! From the readers point of view nothing has changed, but we can insert new figures before our referenced figure or even move the figure to an entirely new chapter and the reference number would automatically be updated.
The \label{} and \ref{} commands, and the ability to tell Latex exactly where you want a figure to be placed is a huge deal when you’re working with theses. Unlike your poor Word-using friends, rearranging chapters, sections, figures, or breaking up your content into smaller files as you see fit becomes no big deal.
Footnotes
In academic writing something we use fairly often is footnotes. In Latex setting up a footnote is as simple as placing the command \footnote{} anywhere you want the marker to appear. Latex will take care of numbering and placing the footnote at the bottom of the page for you.
Let’s add a footnote to our background.tex file:
\chapter{Background}
Look, Latex puts this on a new page\footnote{This is not the case with the article documentclass.} for me!
Working with Equations
Another reason many people use Latex for writing their documents is its support for rendering mathematical equations.
There are 2 main ways people do this: the inline and display math modes.
Inline Math
Inline math is pretty self-explanatory, it is used when we want to display an equation in the same line as our current sentence. To do so, we use the $ symbol to both open and close the mode.
Let’s add a new section to our introduction.tex:
\section{Mathematical Motivation for Research}
The happiness of Microsoft Word users as a function over time can be modeled by the function $y=-x+5$ while scientists have demonstrated that the happiness of \LaTeX can be modeled by the function $y=x^2+9001$.
Display Math
If instead we want our figures to be numbered and appear on their own line (much like a figure), we can use the equation environment. The way that we write equations remains unchanged from the inline style. Let’s add another equation to the bottom of our introduction.tex:
\begin{equation}
    f(x_1, x_2) = \pi * (x_1 - x_2)
\end{equation}
Your introduction chapter should now look like this:
Comments
One super handy feature of Latex is comments. Comments allow us to make notes to ourselves within our .tex files, that are simply ignored by Latex when building your document. You can use these to make reminders to yourself about what a particular line of Latex does, or to plan sections in advanced - and they will never appear in the PDF!
Commenting in Latex is done with the % character. Any text that appears after the % on a line is ignored. For example:
\section{Mathematical Motivation for Research}
% In this chapter I'm going to give a quick intro about why Latex is cool, and prove it mathematically
The happiness of Microsoft Word users as a function over time can be modeled by the function $y=-x+5$ while scientists have demonstrated that the happiness of \LaTeX can be modeled by the function $y=x^{2+y}+9001$.

\begin{equation} % I should also consider investigating whether this equation even makes any sense
    f(x_1, x_2) = \pi * (x_1 - x_2)
\end{equation}
Bibliographies and Citations
Arguably the most common reason people like to use Latex is its ability to handle citations and generate References/Bibliography sections.
This is all handled by a reference management software called BibTeX (which comes bundled with Latex).
BibTeX
Bibtex makes it easy to store all of your references in a tidy, consistent way. It does this by storing all your bibliography items in a separate .bib file. You can think of this as a sort of mini-database.
It’s important to remember that this is a separate system to Latex, so the syntax is a little different.
Each entry in the .bib file has a type associated with it, such as book, article, or conference. These all start with the @ symbol, for example @Book.
For each entry we specify:
- A
key: This is what we will refer to in our Latex code to identify the entry that we want to cite (similar to a\label{}) - A list of fields: This is where we describe the entry (e.g. its
author,titleetc.)
Let’s create a new file in the main (root) folder references.bib and paste in an example entry:
@article{kavanagh2018,
  title={Latex is Magical},
  author={Kavanagh, Sam and White, Gandalf and Dumbledore, Albus},
  journal={Themes in Magic and Wizardry Education},
  volume={10},
  pages={85--119},
  year={2018}
}
Inserting the Bibliography Chapter
Just because we’ve created a bibliography (.bibtex) file, Latex doesn’t know yet that it’s supposed to do anything with it.
In order to tell Latex that we want to have a bibliography we use 2 commands:
\bibliographystyle{}
This is where we specify the style of referencing we’re using, e.g. ACM, APA, IEEE etc.
The other command is simply
\bibliography{}
This is where we actually point to the bibtex file we want to use.
Let’s update our main.tex to tell it we want to use our new bibliography file using these 2 new commands:
...
\input{"chapters/introduction"}
\input{"chapters/background"}

\bibliographystyle{acm}
\bibliography{references}

\end{document}
You should now see a 4th page added to our thesis document with the heading Bibliography.
If you’re wondering why there’s nothing listed under the heading, it’s because we haven’t cited our bibtex entry anywhere in the document yet! Let’s do that now.
Citations
Previously we used the \ref{} command to refer to a label we defined elsewhere in the document. Citing works almost exactly the same way, except we use the \cite{} command to refer to the label (key) we defined for our entry in the .bib file.
Let’s add a new paragraph to the bottom of our introduction.tex file:
Existing research has demonstrated that a basic understanding of Latex allows its users to perform impressive feats of high level magic \cite{kavanagh2018}.
That’s it! In the outputted PDF Latex will replace the \cite{} with a citation corresponding to the style we specified in the \bibliographystyle{} command. Because we’re using the acm style, your Introduction chapter should now look like this:

And even better, your References section should have been updated now that you cited something:

Our thesis is looking pretty awesome now, but before we’re done let’s add a couple more things to make it look even more professional.
Table of Contents and Figure List
Although it doesn’t make much sense for a document of this size, most thesis include both a Table of Contents and a List of Figures.
Setting all this up in Latex is so simple that I’m not even going to explain the commands!
Update our main.tex file with 2 new commands:
...
\begin{document}
\maketitle
\tableofcontents % <- Creates a table of contents
\listoffigures % <- Creates a list of figures
...
Easy peasy! These lists will continue to update automatically as we add to our document.
Well done!!!
If your department doesn't require you to use the UoA thesis template, then congratulations, that's it!
The project you just made looks professional, and is an excellent starting point to build upon for a real thesis!

Even if you're not required to use the UoA thesis template, I recommend you follow on until the end of the workshop as you'll also learn how to use Latex class files to apply predefined styles to your whole document.
The UoA Thesis Template
This produces a thesis template compatible with the School of Graduate Studies style guide (2016).
You can download it here.
The download includes quite a lot of files, including a rather hefty documentation PDF which explains how to install and use the template on different operating systems, and even includes a basic Latex tutorial.
Unless your department actually requires you to use this, you don’t have to. However, even if you aren’t required to use it, you might find that you like the look of the document it generates.
Using the Template in Overleaf
Once you’ve downloaded the .zip file, extract its contents somewhere that you can find again.
In order to use the template we need to use a Latex class file. In the folder you just extracted, within the aucklandthesis sub-folder, you will find a file named aucklandthesis.cls. Upload this file to the root folder of our Overleaf project.
- To tell Latex that we want to use this
.clsfile, all we have to do is change the\documentclass{}toaucklandthesis. - The template also defines 3 new commands
\degreesought{},\degreediscipline{}, and\degreecompletionyear{}which are used to format the thesis title page. - I also recommend changing the
\bibliographystyle{}as the template out of the box doesn’t play so well with theacmstyle (it requires a little more fiddling, check out the template documentation if you’re interested).
These changes are noted by the comments (%) below:
\documentclass{aucklandthesis} % <- The new documentclass
\usepackage{graphicx}

\title{Sam's Latex Thesis}
\author{Sam Kavanagh}

\begin{document}

\degreesought{Doctor of Philosophy} % <- These 3 commands are used to format the title page
\degreediscipline{Computer Science} % <- These 3 commands are used to format the title page
\degreecompletionyear{2018} % <- These 3 commands are used to format the title page

\maketitle
\tableofcontents
\listoffigures

\input{"chapters/introduction"}
\input{"chapters/background"}

\bibliographystyle{apalike} % <- The ACM style doesn't play well with the template
\bibliography{references}

\end{document}
That’s all you need to get up and running with a basic version of the thesis template. You should see the fonts and general appearance of much of the document has changed and looks very snazzy.


Handy Tools
- Have a question? It’s probably already been asked before on the TeX Stack Exchange!
- Wanting to make a table in Latex? Making them by hand is a pain. Instead try this table generator to get up and running, and then tweak the code from there.
- The
todonotespackage allows you to insert to-do items in your document, and provides a\listofdodostoo. Check it out here. This is super helpful for:- Keeping track of future updates you need to make to documents
- Planning your sections in advance
- Annotating your documents so that your supervisors have a list they can quickly refer to in order to see any updates you’ve made
- Hacky Hour: A shared space where students and researchers can congregate to work on their research problems related to code, data, or digital tools in a social environment.
- Every Thursday from 3-4pm in Strata Cafe.
- There’s also a #HackyHour Slack Channel which is open to anyone!
Finished Project Code
\documentclass{aucklandthesis} % <- The new documentclass
\usepackage{graphicx}

\title{Sam's Latex Thesis}
\author{Sam Kavanagh}

\begin{document}

\degreesought{Doctor of Philosophy} % <- These 3 commands are used to format the title page
\degreediscipline{Computer Science} % <- These 3 commands are used to format the title page
\degreecompletionyear{2018} % <- These 3 commands are used to format the title page

\maketitle
\tableofcontents
\listoffigures

\input{"chapters/introduction"}
\input{"chapters/background"}

\bibliographystyle{apalike} % <- ACM doesn't work well with the template
\bibliography{references}

\end{document}
\chapter{Background}
Look, Latex puts this on a new page\footnote{This is not the case with the article documentclass.} for me!

Latex has a steeper learning curve than Microsoft Word, but as the document grows it makes your life a lot easier!

\begin{figure}[h]
    \begin{center}
        \includegraphics[scale=0.25]{"figures/latex-vs-word"}
        \caption{Latex document complexity vs time and effort.}
        \label{fig:latexVsWord}
    \end{center}
\end{figure}

If you're still unsure about whether you want to use Microsoft Word or Latex, refer to Figure \ref{fig:latexVsWord} for irrefutable evidence of Latex's superiority.
\chapter{Introduction}
Welcome to my professional looking Latex thesis.

\section{Mathematical Motivation for Research}
The happiness of Microsoft Word users as a function over time can be modeled by the function $y=-x+5$ while scientists have demonstrated that the happiness of \LaTeX can be modeled by the function $y=x^{2+y}+9001$.

\begin{equation}
    f(x_1, x_2) = \pi * (x_1 - x_2)
\end{equation}

Existing research has demonstrated that a basic understanding of Latex allows its users to perform impressive feats of high level magic \cite{kavanagh2018}.
@article{kavanagh2018,
  title={Latex is Magical},
  author={Kavanagh, Sam and White, Gandalf and Dumbledore, Albus},
  journal={Themes in Magic and Wizardry Education},
  volume={10},
  pages={85--119},
  year={2018}
}
That’s it, Well done!

Hopefully you’ve seen the light, and realize the potential power of Latex once you get the hang of it.
If not… Well, I tried. Microsoft Word is still a thing I guess.
